Aegis is the long-standing favorite authenticator on Android. Your codes sit in a vault encrypted with AES-256-GCM, unlocked by your password or fingerprint. The app has no internet access, needs no account, and backs up to a folder you choose. It also reads Google Authenticator’s export codes directly, so you don’t type anything by hand.
On iPhone? Aegis doesn’t exist there. Use Ente Auth or 2FAS instead. Our Google Authenticator alternatives page compares them and covers moving your passwords too. Choose Ente Auth on Android as well if you want your codes synced between several devices.
Before You Start
- Two devices make this easy. The phone with Google Authenticator shows the export codes, and the phone with Aegis scans them. If both apps are on the same phone, read Only one phone first.
- Update Google Authenticator. Google says the old device needs the latest version to export.
- Know what won’t move. Steam, Microsoft’s push approvals and banking apps don’t use standard codes. You set those up again inside each service.
- Find your backup codes for your most important accounts, such as email, bank and password manager. They get you in if a code fails.
- Have paper ready for your Aegis password.
Set up Aegis
- Install Aegis from F-Droid or Google Play.
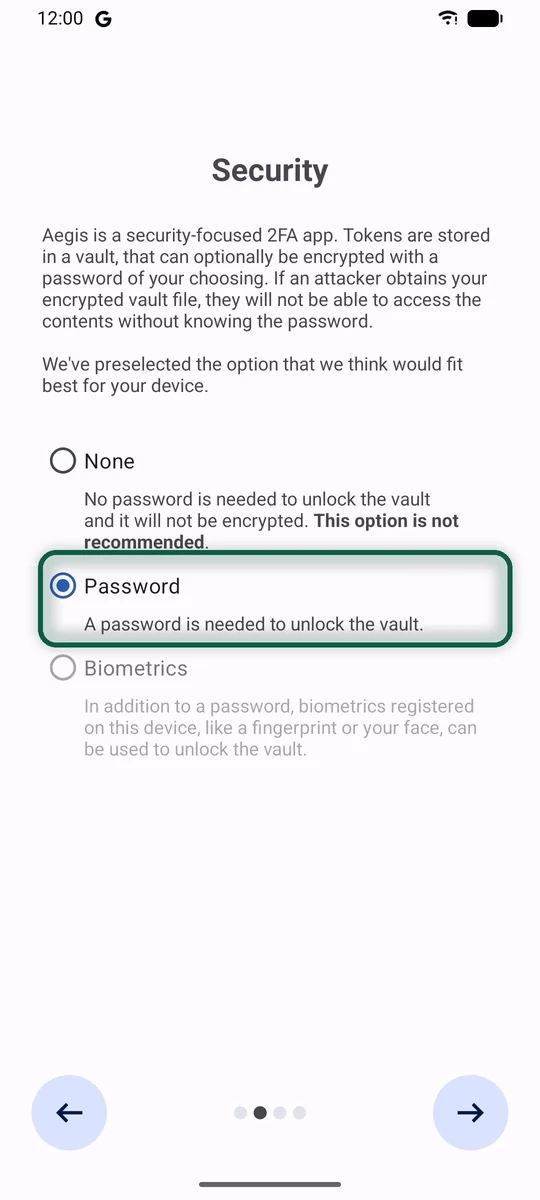
- Open it and go through the welcome screens. On the Security screen, choose Password, or Biometrics if you also want fingerprint or face unlock. Biometrics still needs a password. Never choose None, which leaves the vault unencrypted.
- Enter a long password twice. Aegis warns that if you forget it, you lose your codes permanently, so write it down and keep the paper with your backup codes.
Then open the menu, choose Settings, then Security, and check these.
- Screen security blocks screenshots inside Aegis. Leave it on.
- Tap to reveal hides codes until you tap them. Turn it on if people often see your screen.
- Auto lock locks the vault when you leave the app or lock the phone.
- Password reminder asks for your password now and then even if you use your fingerprint. Aegis strongly advises against turning it off.
Export Your Codes From Google Authenticator
- On the phone with Google Authenticator, open the app’s menu and tap Transfer codes, then Export codes. Older versions of the app say Transfer accounts and Export accounts.
- Unlock your phone when asked.
- Select all your accounts and tap Next.
Google Authenticator now shows a QR code. If you have many accounts, it splits them across several codes. Leave this screen open.
Scan the Export Into Aegis
- In Aegis, tap the + button, then Scan QR code.
- Point the camera at the first QR code. Aegis recognizes a Google Authenticator export and shows its progress, such as Scanned 1/3 QR codes.
- On the old phone, move to the next QR code and scan it. Go in order. Aegis warns you if it sees code 3 when it expected code 2.
- After the last code, the scanner closes and Aegis adds every account at once, with a message such as Added 12 new entries to the vault. If your export held a single account, Aegis opens it so you can check it and save.
Count the entries against the list in Google Authenticator. If you leave the scanner before the last code, Aegis adds nothing, so start again from the first code.
Only One Phone
Google Authenticator on Android blocks screenshots of its export codes. You need a second camera, such as an old phone, a tablet or a digital camera.
- Photograph each QR code with the other device.
- Copy the photos to your phone, ideally over a USB cable.
- In Aegis, tap +, then Scan image, and pick all the photos.
- Delete the photos from both devices, including any trash or recently deleted folder.
If a photo is missing or unreadable, Aegis shows Incomplete Google Authenticator export detected and lists the missing codes. You can import the partial set, but Aegis recommends trying again with every code, and so do we.
Test Every Code
Do this before you change anything in Google Authenticator.
- Compare the codes side by side. For each account, both apps should show the same six digits at the same moment.
- Sign in for real to the accounts that matter most. Log out, then log back in with the code from Aegis. Start with your email, your bank, your password manager and your Apple or Microsoft account. If your Google account uses Google Authenticator for 2-Step Verification, test that one too.
- Fix what’s missing. For any account that didn’t come across, sign in, open its security settings, set up an authenticator app again, scan the new QR code with Aegis, and enter the code it shows to confirm.
You can now tidy up. Aegis lets you put entries into groups, sort them and add icons from community icon packs.
Turn on Encrypted Backups
Aegis never goes online, so backups are your job. Set them up now, before you delete anything from Google.
- In Aegis, open Settings, then Backups.
- Turn on Automatically back up the vault and choose a Backup location. Pick a folder that you copy off the phone, for example one synced by Nextcloud or Syncthing, or an SD card.
- Under Backup strategy, choose Keep a number of versions, then set the Number of versions to keep. Aegis calls the single-backup option unreliable.
- Leave the Backup reminder on.
Aegis only makes automatic backups of an encrypted vault. Backups use your vault password unless you set a Separate password for backup & export in Security settings.
Also make one manual copy today. Open Import & Export, tap Export, choose Aegis (.JSON), leave Encrypt the vault ticked, and save the file to a USB stick or a computer. Aegis warns against unencrypted exports.
The Android cloud backups switch lets your phone’s own backup include the encrypted vault. On a phone with Google services, that backup goes to Google. The vault stays encrypted, but leave the switch off if you want nothing of it on Google’s servers.
To restore on a new phone, install Aegis, open Import & Export, choose Import from file, pick Aegis and select your backup file.
Clean up Google Authenticator
Wait until every important code has passed a real sign-in and your first backup exists.
- If you ever signed in to Google Authenticator, tap your profile picture, then Use Authenticator without an account. Google says this removes your codes from all your Google accounts and keeps them only on this phone.
- Delete the entries in Google Authenticator, then uninstall the app.
- Keep your backup codes on paper, away from the phone.
If you’re also switching phones, keep the old one untouched for a week or two as a fallback, then reset it.
The accounts in your authenticator are also a good start on the list of logins to move when you leave Gmail. Our scan builds that list from your password export, in your browser.
Moving on From Aegis Later
You aren’t locked in. Export for Google Authenticator in Aegis’s Import & Export settings creates QR codes in Google’s export format, which any app that imports from Google Authenticator can read. Aegis notes that these only include standard 6-digit codes. Proton Authenticator also imports Aegis files directly, which helps if you ever move to an iPhone.
What You Lose
Troubleshooting
Aegis Says the QR Code Is Unrelated
You probably mixed codes from two separate exports, for example after going back and starting the export again. Close the scanner, start a fresh export in Google Authenticator, and scan its codes from the first one onward.
A Code From Aegis Is Rejected
Codes depend on your phone’s clock, and Aegis says a few seconds off can be enough to break them. It warns you when automatic time is turned off. Set the date and time to update automatically in Android’s settings, then wait for the next code. If one account still fails, set it up again in that service’s security settings.
Fingerprint Unlock Stopped Working
This usually follows a change to your phone’s security settings, such as a new fingerprint. Unlock Aegis with your password, then turn Biometric unlock off and on again under Settings, then Security.