Immich looks and works a lot like Google Photos, with a timeline, face recognition, a map, memories and automatic phone backup. The difference is where it runs. Your photos sit on a machine in your home, and you keep it running, updated and backed up.
This guide covers the Immich side of the move. For the Takeout export and the JSON metadata problem in general, see our Google Photos migration guide.
Is Self-Hosting Right for You?
Be honest with yourself before you buy hardware. Running Immich means four jobs that never end.
- Updates. Immich releases often. Version 3.0 (July 2026) had breaking changes, and Immich doesn’t support downgrades, so you read the release notes before every upgrade.
- Backups. A server in your closet is one copy. You need two more, one of them away from home.
- Remote access. Reaching your photos safely from outside takes a VPN or a properly set up HTTPS proxy.
- Hardware. Disks fail and the power goes out, and nobody fixes it but you.
You should be comfortable in a terminal, editing a text file and running Docker commands. If that’s not you, Ente gives you most of the features with none of the upkeep. You can also try Immich alongside Google Photos for a few weeks before you commit, which costs nothing but time. Our Immich vs Google Photos comparison weighs the costs and the upkeep if you’re still deciding.
What You Need
A Server
| Minimum | Recommended | |
|---|---|---|
| Operating system | 64-bit Linux, such as Ubuntu or Debian | Same. Immich strongly discourages Windows and macOS hosts |
| Memory | 6 GB (4 GB if you turn off machine learning) | 8 GB |
| Processor | 2 cores, amd64 or arm64 | 4 cores |
| Photo storage | Your library plus 10–20% for thumbnails and converted videos | Room to grow |
| Database | 1–3 GB on a local SSD | Never on a network share |
Common choices are a mini-PC, a NAS that runs Docker, or an old desktop running Linux. Immich runs well in a full virtual machine, but its docs don’t recommend Docker inside an LXC container. On Intel and AMD machines, the version 3 machine-learning container needs a processor that supports the x86-64-v2 level, which rules out very old hardware.
Disk Space
Take your usage from photos.google.com/storage and add 20%. A 300 GB library needs about 360 GB on the server, and the same again for each backup copy. immich-go reads the zips directly, so you don’t need room to unzip the Takeout.
A Backup Plan
Decide where copies 2 and 3 will live before you import, as the backup section explains. An external USB disk plus an off-site copy is the usual answer.
Install Immich With Docker Compose
Follow the official Docker Compose guide. It’s short, and it changes between releases. In outline, it goes like this.
- Install Docker Engine with the Compose plugin. Immich needs the
docker composecommand, and the olddocker-composeisn’t supported. - Create a folder such as
immich-app, then downloaddocker-compose.ymlandexample.envfrom Immich’s latest release. Renameexample.envto.env. - In
.env, setUPLOAD_LOCATIONto a folder on your big disk andDB_DATA_LOCATIONto a local SSD. SetTZto your time zone, and changeDB_PASSWORDusing only letters and digits. - In that folder, run
docker compose up -d. - Open
http://SERVER-IP:2283in a browser, click Getting Started and create your account. The first account becomes the admin.
Two settings are easier to choose before the import than after it.
- Storage template. If you want the files on disk sorted into year and date folders, turn it on under Administration, then Settings, then Storage Template. Turning it on later means running the Storage Template Migration job over everything.
- Other users. Give each family member their own account under Administration, then Users, then Create user. Each person imports their own Takeout with their own API key.
Export Google Photos With Takeout
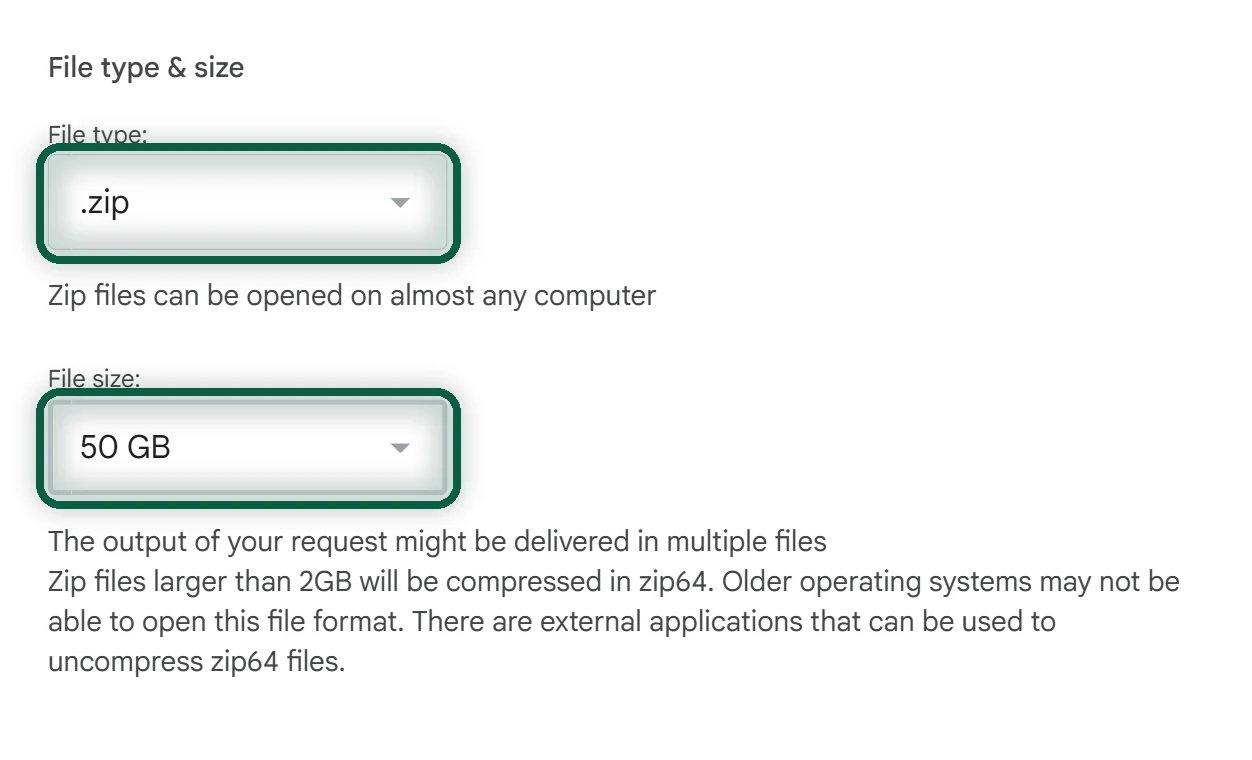
Export with .zip and 50GB, as our Takeout guide explains, and download every part within about 7 days. Don’t unzip anything. Put the zips on a disk that the computer running immich-go can read. That can be your laptop rather than the server, as long as it reaches the server over your network.
Import With immich-go
immich-go is a free, open-source command-line tool from the Immich community. Its from-google-photos mode reads the zips, matches each photo with its JSON file and uploads it with its date, location, description and albums. It works with Immich versions 2 and 3. Its README calls it an early version that hasn’t been tested extensively and asks you to keep a backup of your files, which is one more reason to keep the zips.
Create an API Key
In Immich, open Account Settings, then API Keys, and create a key. Give it the permissions listed in immich-go’s installation docs, and copy it somewhere safe.
immich-go pauses Immich’s background jobs during the upload, and that needs a key from an admin account. To import into a family member’s account that isn’t an admin, use their key and add --pause-immich-jobs=false.
Install immich-go
Download the file for your system from the immich-go releases page on GitHub. There are builds for Windows, macOS, Linux and FreeBSD, on Intel, AMD and ARM, and you don’t need Node.js or Docker. Unzip it, then check that it runs.
- On Linux and macOS, run
./immich-go --version. If you get “Permission denied”, runchmod +x immich-gofirst. - On Windows, run
.\immich-go --version.
Do a Dry Run First
The --dry-run option goes through the whole Takeout without uploading anything, so you can see what immich-go found.
./immich-go upload from-google-photos --server=http://192.168.1.20:2283 --api-key=YOUR-KEY --dry-run /path/to/takeout-*.zip
Replace the address with your server’s and the path with your zip files. On Windows, start with .\immich-go instead.
Run the Import
Run the same command without --dry-run. immich-go shows its progress in the terminal. Keep the computer awake, ideally on a network cable. When it finishes, Immich resumes its background jobs and starts making thumbnails and finding faces, which can take hours on a small server.
The defaults suit most people. These options are worth knowing.
| Option | Default | Change it when |
|---|---|---|
--include-unmatched |
Off | Photos without a JSON file are missing. They arrive with less metadata |
--include-partner |
On | Your partner imports their own library, to avoid doubles |
--include-archived |
On | You don’t want photos you archived in Google |
--include-trashed |
Off | You want what was in Google’s trash |
--sync-albums |
On | You don’t want your Google albums recreated |
--people-tag |
On | You don’t want people’s names from Google added as tags |
--on-errors |
stop |
One bad file keeps halting a big import. Set it to continue |
To switch an option off, add =false, as in --include-partner=false.
Check the Result
- Read immich-go’s summary at the end of the run, and compare it with the number of photos and videos in your Takeout.
- Scroll the timeline year by year. A pile of photos on today’s date means some dates weren’t matched.
- Open the map, a few albums and some videos.
- If photos are missing, run the import again with
--include-unmatched. Immich recognizes files it already has by their checksum, so the second run adds only what was left out.
Set up Phone Backup
- Install the Immich app from the App Store, Google Play or F-Droid.
- Sign in with your server address,
http://SERVER-IP:2283while you’re at home. - Tap the cloud icon in the top-right corner, choose the albums to back up, then tap Enable Backup.
- When the app has caught up, turn off backup in the Google Photos app.
Immich skips files it already has, so phone photos that came in through the Takeout aren’t uploaded twice if the files are identical. Backups run only on Wi-Fi by default.
Background backup needs a little help on both systems.
- On iPhone, turn on Background App Refresh. iOS decides when Immich may run, and opening the app often helps.
- On Android, exempt Immich from battery optimization, since some brands are strict about it. You can also limit backups to when the phone is charging.
Background sync is still weaker than Google Photos’, so open the app every few days.
Reach Immich Away From Home
Don’t forward port 2283 on your router. Immich’s docs warn that this exposes the web interface over plain HTTP, which leaves your login open to interception. Use one of these instead.
| Method | What you set up | Choose it if |
|---|---|---|
| Tailscale | An app on the server and on each phone. Free tier for personal use | You want the simplest secure option, or can’t open router ports |
| WireGuard or OpenVPN | A VPN server at home, an open router port, usually dynamic DNS | You’d rather not rely on an outside company |
| Reverse proxy with HTTPS | A domain, a Let’s Encrypt certificate and a proxy such as Nginx | People need to reach Immich in a browser with no app installed |
A reverse proxy is the most complex choice, and it puts Immich on the public internet, so keep the server updated if you go that way. For most households, Tailscale is the easy safe answer.
Back up the Server With the 3-2-1 Rule
Immich’s docs recommend a 3-2-1 strategy, meaning 3 copies of your data, 2 of them at home on different devices and 1 off-site. The server is copy one. A pair of mirrored disks protects you from a dead disk, not from a deleted album or a bad update, so it doesn’t count as a backup.
What to Back Up
- Your files. Back up the whole
UPLOAD_LOCATIONfolder. At the very least, that’slibrary,upload,profileandbackups. You can skipthumbsandencoded-video, but Immich then has to rebuild them after a restore. - The database. Immich saves a dump of it every day at 2 AM into
UPLOAD_LOCATION/backupsand keeps the last 14. Change this under Administration, then Settings, then Database Dump Settings. A dump holds your albums, people and other metadata but no photos, so you always need both.
How to Back Up
Use a backup tool such as restic or rclone to copy those folders to an external disk and to somewhere off-site, such as a disk at a relative’s home or encrypted cloud storage. Ideally, stop the immich-server container while the backup runs. If you can’t, copy the database dumps first and the photo folders second. In that order, the worst case is a few files the database doesn’t know about.
Test a restore at least once. Under Administration, then Maintenance, Restore database backup brings back a dump, and Immich makes a restore point first. Better still, restore onto a spare machine. A backup you’ve never restored is a guess.
Keep the Takeout zips as well. They’re the closest thing to what Google held.
Keep Immich Updated
Before each update, read the release notes for breaking changes and check that last night’s backup worked. Phone apps usually work with the current and the previous major version of the server, so update them first. Then run this in your Immich folder.
docker compose pull && docker compose up -d
If .env pins IMMICH_VERSION, change it first. Downgrades aren’t supported, so your backup is the only way back from a bad upgrade.
Delete From Google Photos Last
Give it a few weeks. Make sure your backups run, phone backup works and you’ve restored from a backup once. Then turn off Google Photos backup on every device, because deleting in Google Photos also deletes photos from devices that still back up to it. On photos.google.com, select the photos, click Move to trash, then empty the Trash. The general guide covers what else to tidy up.
Troubleshooting
The database won’t start on Windows. It can’t live on NTFS, or under /mnt in WSL. Point DB_DATA_LOCATION at a Docker named volume, as Immich’s requirements page explains.
Docker rejects the -d flag or can’t read .env. You probably have the wrong Docker version. Install Docker’s official Engine.
immich-go can’t pause jobs. The key isn’t from an admin account. Add --pause-immich-jobs=false.
Certificate errors. Fix the certificate on your proxy. immich-go has a --skip-verify-ssl option, but its docs don’t recommend it for regular use.
Uploads time out on a slow server. Lower --concurrent-tasks, or raise --client-timeout from its default of 20 minutes.
When your photos are home, the scan tool shows which other Google services you still rely on.